Sunday, September 30, 2012

Create PHP project in NetBeans 7.1

Follow the steps below...

1. Open .

2. Click  to create a new project.


3. On the New Project dialog choose PHP from the Categories then choose PHP Application as the project type, the hit .


4. Fill up the field(s), then hit .

Project Name: <name_of_your_app>
Sources Folder: C:\xampp\htdocs\<name_of_your_app>

5. Setup some project configuration, then hit .

Run As: Local Web Site (running on local web server)
Project URL: http://localhost:81/<your app>/
*** On the sample project the Apache HTTP Server is running on Port 81

6. Choose any framework if needed, then hit .


Start Coding!


Run query against MySQL database using NetBeans IDE

Follow the steps below...
1. Open .


2. Choose the tab.


3. Right click the  then choose New Connection....


4. The New Connection Wizard will appear, choose the MySQL (Connection/J drive)  then hit the  button.


5. Fill up the field(s) for the MySQL connection, then click  button (leave the Database field as blank).


6. Hit  button.


7. On the  tab choose the  then double click the  to show the list of all databases in the MySQL server.

8. Select any database and any table table on the listed items.


9. Right click the table (e.g. studentdb.tblstudents) then choose Execute Command...


10. The SQL Command window will appear, type any query then hit  
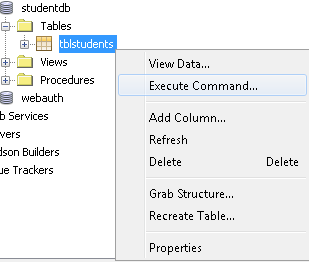
or press Ctrl + Shift + E to run. 

Sample result


Get the hardware details of your USB flash drive

The Windows Management Instrumentation a.k.a. WMI is a great tool to retrieve information about a certain device on Window-based PC (most C/C++ developers are familiar with this tool), To know more about WMI click here.

To get the data of the below device.


Figure 1: Cruzer Blade USB Flash Drive 

Follow these steps...


1. Plug in the flash drive.
2. Click the .
3. Type powershell on .
4. Choose  from the listed items.
5. On the PowerShell CLI enter:

Get-WmiObject -Query "SELECT * FROM Win32_PnPEntity WHERE Manufacturer = 'SanDisk'"

Output