Sunday, September 30, 2012

Create PHP project in NetBeans 7.1

Follow the steps below...

1. Open .

2. Click  to create a new project.


3. On the New Project dialog choose PHP from the Categories then choose PHP Application as the project type, the hit .


4. Fill up the field(s), then hit .

Project Name: <name_of_your_app>
Sources Folder: C:\xampp\htdocs\<name_of_your_app>

5. Setup some project configuration, then hit .

Run As: Local Web Site (running on local web server)
Project URL: http://localhost:81/<your app>/
*** On the sample project the Apache HTTP Server is running on Port 81

6. Choose any framework if needed, then hit .


Start Coding!


Run query against MySQL database using NetBeans IDE

Follow the steps below...
1. Open .


2. Choose the tab.


3. Right click the  then choose New Connection....


4. The New Connection Wizard will appear, choose the MySQL (Connection/J drive)  then hit the  button.


5. Fill up the field(s) for the MySQL connection, then click  button (leave the Database field as blank).


6. Hit  button.


7. On the  tab choose the  then double click the  to show the list of all databases in the MySQL server.

8. Select any database and any table table on the listed items.


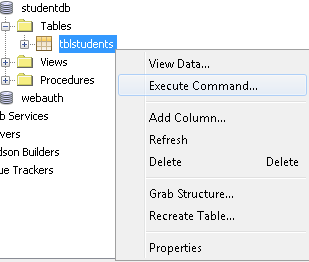
9. Right click the table (e.g. studentdb.tblstudents) then choose Execute Command...


10. The SQL Command window will appear, type any query then hit  or press Ctrl + Shift + E to run. 

Sample result


Get the hardware details of your USB flash drive

The Windows Management Instrumentation a.k.a. WMI is a great tool to retrieve information about a certain device on Window-based PC (most C/C++ developers are familiar with this tool), To know more about WMI click here.

To get the data of the below device.


Figure 1: Cruzer Blade USB Flash Drive 

Follow these steps...


1. Plug in the flash drive.
2. Click the .
3. Type powershell on .
4. Choose  from the listed items.
5. On the PowerShell CLI enter:

Get-WmiObject -Query "SELECT * FROM Win32_PnPEntity WHERE Manufacturer = 'SanDisk'"

Output


Thursday, July 26, 2012

MFC w/ MS Access (.mdb) via ODBC

This tutorial is about connecting an MFC application to a MS Access database.

 I. Microsoft Access


 II. MFC 

Explanations are inline with the code.

Header file

              #include "afxdb.h"


Sample Code

              // data source variable 
              CDatabase database; 

              CString sID, sSurname, sGivenName, sMiddleName, sAddress, sFullName;

              // using odbc driver againts the database on "C:\"
              CString sConnStr = L"ODBC;DRIVER={Microsoft Access Driver (*.mdb)};DSN='';DBQ=C:\\LibraryDB.mdb";

              // opening the connection to the db
              if(!database.Open(NULL, false, false, sConnStr))
                     return;

                     // recordset instance
                     CRecordset rs(&database);

                     // perform the query
                     if (!rs.Open(CRecordset::forwardOnly, L"SELECT * FROM tblStudents", CRecordset::none))
                           return;
             
                     while (!rs.IsEOF())
                     {
                           // Fetch the value of the field
                           rs.GetFieldValue(L"ID",sID);
                           rs.GetFieldValue(L"Surname",sSurname);
                           rs.GetFieldValue(L"GivenName",sGivenName);
                           rs.GetFieldValue(L"MiddleName",sMiddleName);
                           rs.GetFieldValue(L"Address",sAddress);
                    
                           sFullName.Format(L"%s, %s %s", sSurname, sGivenName, sMiddleName);

                           // show the fullname
                           AfxMessageBox(sID + " - " + sFullName);

                           // move to next record
                           rs.MoveNext();
                     }
      
              // close the record set
              rs.Close();

              // close the db connection
              database.Close();

 II. Output

             

Monday, April 30, 2012

CodeIgniter's Form Validation w/ jQuery Ajax

In order to use CI's form validation you need to load the form_validation library, then you need to set rules on each field you want to validate, If validation is successful a $this->form_validation->run() should be equal to TRUE. Ajax can be used to avoid a full page refresh resulted from a form validation. 


A good example to this is a user registration page, suppose the page's username, password and confirm password fields are all required plus the confirm password field needs to match the password field value.


Please examine the controller class below:
<?php
 class Account extends CI_Controller{

  function __construct(){
   parent::__construct();
   $this->load->helper(array('form', 'url'));
   $this->load->library('form_validation');
  }
   
  function index() {
   $data['title'] = 'CI error validation using jQuery Ajax';
   $this->load->view('signup', $data);
  }

  function signup() {  
   $this->form_validation->set_rules('un', 'Username', 'trim|required');
   $this->form_validation->set_rules('pw', 'Password', 'trim|equired');
   $this->form_validation->set_rules('pw1', 'Password Confirmation', 'trim|required|matches[pw]');
   if ($this->form_validation->run() == FALSE) {
    echo validation_errors();
   } else {
    //TODO: Logic for user registration.
   }  
  }
 } ?>
**** An echo validation_errors(); is use to raise error messages on the page. This error messages will be pass asynchronously using an Ajax call.

Please examine the view page below:
<html>
    <head>
        <title><?= $title; ?></title>
        <script type="text/javascript" src="http://ajax.googleapis.com/ajax/libs/jquery/1.7.2/jquery.min.js"></script>        
        <script type="text/javascript">
        $(document).ready(function(){
  $('#reg').click(function(){
   $.post("<?= base_url() . 'index.php/account/signup' ?>",
    $("form").serialize(),
    function(result) {
     $("#error_message").html(result).appendTo("form"); 
   },"html");
  });    
        });
        </script>
    </head>
    <body>
        <form>
        <div id="error_message" style="color:red"></div>
        <table>
  <caption>Sign Up Now</caption>
  <tr><td>Username</td>
   <td><?= form_input('un', ''); ?></td></tr>
  <tr><td>Password</td>
   <td><?= form_password('pw', ''); ?></td></tr>
  <tr><td>Confirm Password</td>
   <td><?= form_password('pw1', ''); ?></td></tr>
        </table>
        <div style="height: 20px"></div>
        <input type="button" id="reg" value="Register" />
        </form>
 </body>
</html>
**** On the $(document).ready function a click event is attached using $('#reg').click function, this event can trigger a jQuery post that will transfer a serialized values of form fields to the /account/signup action method, A callback function will later give the returned data using the result variable.


**** If an error occurred the result's value will be appended to the form element, refer below.

**** Using alert(result); The actual returned data is showed below.